
Sam cleaning the Citadel (GoT) for 10 hours with Python
As a fan of Game of Thrones, I couldn’t wait for it to return for a 7th season. Watching the season premier, I greatly enjoyed that iconic scene of Sam doing his chores at the Citadel.
I enjoyed it so much that I wanted to see more of it… much more of it.
In this post we’ll take the short video compilation of Sam cleaning the Citadel, we will split it to multiple sub clips and create a video of Sam cleaning the Citadel using a random mix of those sub clips.
Now, it would have taken me about five minutes to do all of this manually by splitting the video and then combining all the parts using some video editing program. But why would I waste five minutes when I can spend a whole weekend doing the same thing with Python?
I mean… am I right or am I right? Right?
Anyway…
We will use Python to analyze the audio from the video, find the “silent” parts in the audio, and use those to split the video into sub clips. Then, we will combine those sub clips in a random order and save it as a new video file.
Disclaimer: As this is one of the first times I’ve actually done this kind of signal processing and analysis, I’m pretty sure there are better and more optimized ways to do this kind of thing. If you have different suggestions, please share them in the comments.
Source code can be found on github.
Create a dev environment for our project
For this project, I used two main packages:
Start by creating a virtual / conda environment with the following packages:
numpy
matplotlib
librosa
moviepy
jupyter
progressbar
We will use the librosa package to analyze the audio from the video and find silent frames in it.
After that we will use those frames to split the video and combine them randomly using the moviepy package.
You may also need to install ffmpeg on your computer for processing the video files, since it’s needed for MoviePy to run.
On OSX, you can install ffmpeg by running the following command line:
brew install ffmpegProcessing the audio frames from the video
First we’ll load the audio from our video file:
video_file_path = "resources/sam_citadel.mp4"
audio_data, sr = librosa.load(video_file_path)
librosa.load will load the audio data from the file as a numpy array into audio_data and will set the sampling rate of the audio data in sr, which is the number of samples per second in the audio. In this case, the sample rate was 22,050 Hz, which means 22,050 samples per second.
Lets take a look at the audio.
In order to do that we can use librosa.display to plot the wave.
The code for that will use librosa and matplotlib packages:
import librosa
import librosa.display
import matplotlib.pyplot as plt

video_file_path = "resources/sam_citadel.mp4"
audio_data, sr = librosa.load(video_file_path)
librosa.display.waveplot(audio_data)
plt.show()
If we run the above code on our video file we will get the following wave plot:
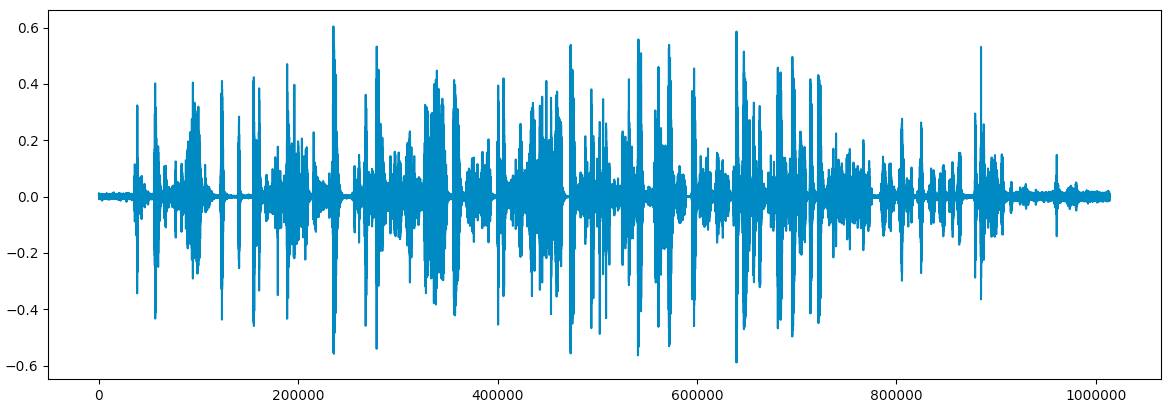
Seems like the audio for this scene is a bit noisy. We want to separate the video into sub clips, and will assume that there is a brief period of silence between them. In order to find the boundaries for each sub clip, we first need to define what “silence” looks like in our wave plot.
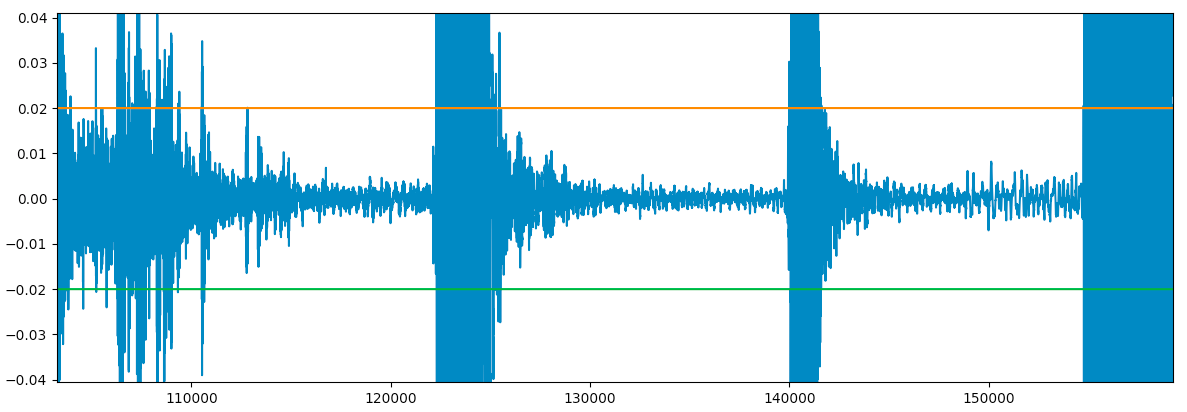
Let’s zoom into one of the parts in the audio and try to identify the “boundaries of silence”:

We get a better and clearer image of what the audio looks like in the “silent” parts:
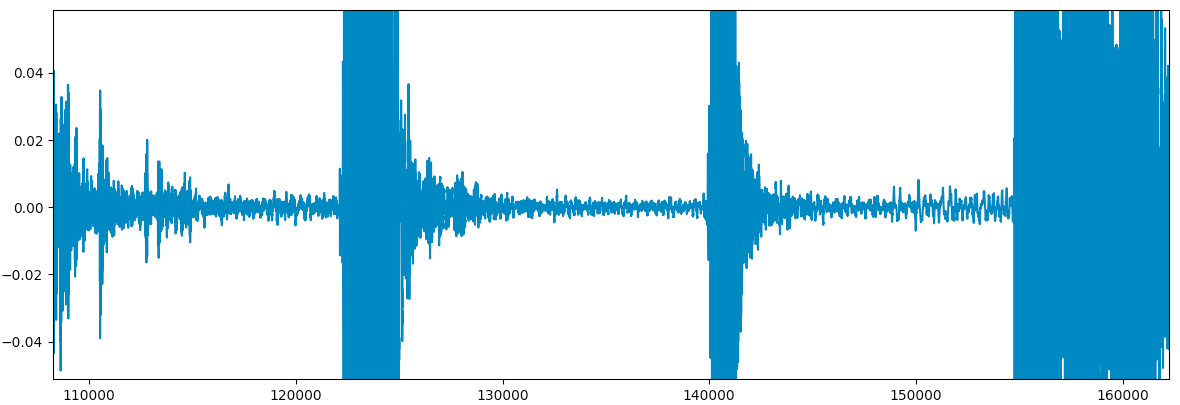
It seems like we can declare that a location in the audio is silent if the wave is between -0.02 to 0.02.
We can add these limit to the wave plot to see how much of it is “silent”:
import librosa
import librosa.display
import matplotlib.pyplot as plt

# Load audio from file
video_file_path = "resources/sam_citadel.mp4"
audio_data, sr = librosa.load(video_file_path)

# Display wave plot
librosa.display.waveplot(audio_data)

# Add limits between -0.02 and 0.02
plt.plot([0.02] * len(audio_data))
plt.plot([-0.02] * len(audio_data))

# Show the plot
plt.show()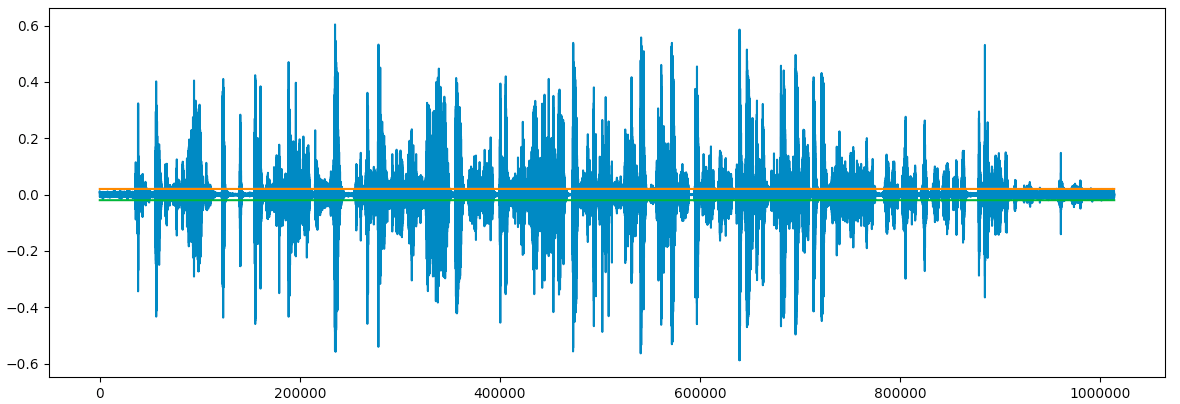
We can zoom into one of the parts in the audio and check our “boundaries of silence”:
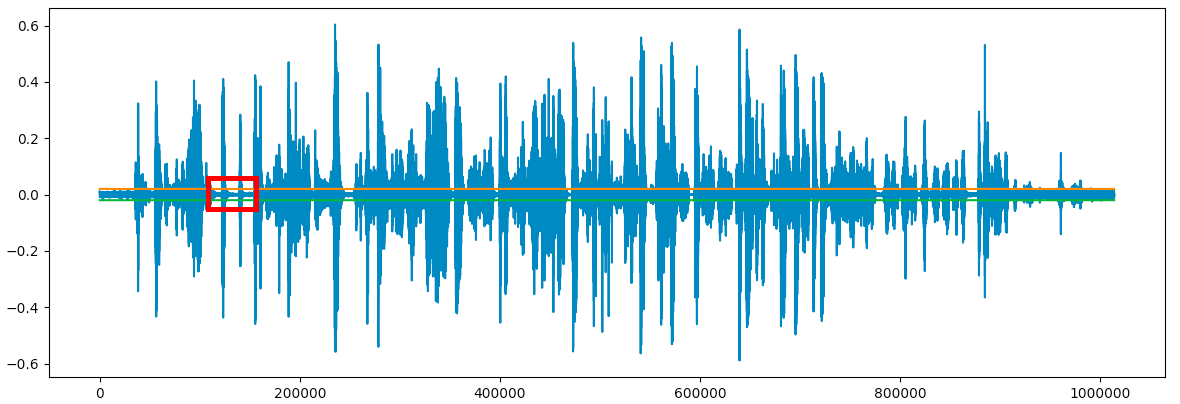
We can see that the boundaries we created contain the “silent” part of the audio. Seems like we might have been able to set a lower limit:
Once we set our limits, we can analyze the audio and try to find “silences”.
We don’t want to do this for each point since we have 22,050 of them per second, so we will define a frame as a small chunk of the audio file. We do that by setting a frame size in seconds and then iterating over the audio data, frame by frame, and checking for each frame if it has a value that exceeds our limits. If all values in the frame are between the limits, we can say the frame is “silent”.
Labeling “silent” frames:
import math
import librosa
import librosa.display
import matplotlib.pyplot as plt

# Load audio from file
video_file_path = "resources/sam_citadel.mp4"
audio_data, sr = librosa.load(video_file_path)

max_limit = 0.02
frame_size = 0.1
frame_len = frame_size * sr

# Calculate the number of frames in the audio file
num_of_frames = math.floor(len(audio_data) / frame_len)

silent_frames_indexes = []
for frame_num in range(int(num_of_frames)):
    # Get the start and end of the frame
    start = int(frame_num * frame_len)
    stop = int((frame_num + 1) * frame_len)

    # Get the absolute values in each frame
    abs_frame = map(abs, audio_data[start:stop])

    # Get the maximum value in the frame
    cur_max_val = max(abs_frame)

    # We've reached a "silent" frame if the maximum
    # value in the frame below our limit
    if cur_max_val < max_limit:
        silent_frames_indexes.append(frame_num)
What we’ve done here is find the indexes of “silent” frames in the audio.
In this case the frame size is set to 0.1s, meaning that all data points in a 0.1s chunk of audio are considered a frame. This means that each frame contains 0.1 * sample rate (22050) (2,250) data samples. This frame size worked well for this program, since we expect the sub clips to be longer than that. You can play around with this size and see how it changes the result.
For each frame, if the maximum absolute value of the frame is below our limit (0.02) we mark it as a “silent” frame and collect it in our silent_frames list.
Once we collected all indexes of the “silent” frames, we can plot them on our audio wave:
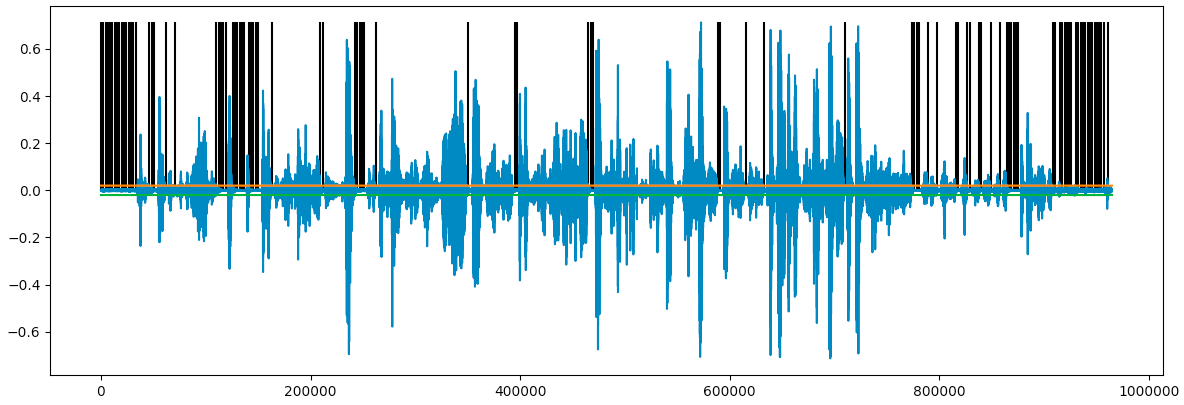
Looks like we marked a lot of sections as “silent”! We can aggregate consecutive “silent” frames, and plot the start of each “silent” sequence:
# Aggregate the frames into sections of silent frames
aggregated_frames = [(silent_frames[0], 0)]
    for index, frame_num in enumerate(silent_frames[1:]):
        # Check if we have a large enough frame
        if frame_num - silent_frames[index] > FRAME_MIN_SIZE:
            # Find the local minimum in the frame and set it as the frame start / end location
            start = int(frame_num * frame_len)
            stop = int((frame_num * frame_len) + (FRAME_DURATION * FRAME_MIN_SIZE * sr))
            frame = map(abs, audio_data[start:stop])
            min_val_index = frame.index(min(frame)) + (frame_num * frame_len)
            aggregated_frames.append((frame_num, min_val_index))
In this code section, we aggregated the sections of silent frames in order to create longer frames. These frames will be used later for splitting our video into sub clips, then mixing them together for our new Sam in the Citadel video mix. As we want to make sure that our frames are long enough, we also check that our aggregated frames are more than 3 frames long. This is set using the FRAME_MIN_SIZE value.
We also added a functionality that searches for the lowest local minimum in our audio. We need this feature so that when we cut our audio/video into sub clips we will end each sub clip at the most silent point that we can find in our “silent” frames.
Let’s take another look at the cleaner plot:

We can now use the most silent point of each “silent” sequence as the beginning of each sub clip in the video. We will split the video accordingly, meaning we need to save a list of the start of each “silent” sequence and the end of the desired frame. For finding the end of the frame we will use the sample just before the start of the next “silent” sequence.
We will create a list of audio frames, each with a start and end index:
# Zip the frames together so we'll have a complete list of frames
frames = zip(
    [frame[1] for frame in aggregated_frames],
    [frame[1] - 1 for frame in aggregated_frames][1:]
)

# Check if we calculated frames until the end of the file.
# If not, add another frame until the end of the file.
if frames[-1][1] < len(audio_data):
    frames[-1] = (frames[-1][0], len(audio_data))
That’s it, we have everything we need in order to create our new (longer and better!) video of Sam’s Citadel chores.
Yes, Sam, it will be magnificent.

Creating the video mix
Now that we have a list of each audio frame’s start and end indexes, we can use it for creating our new video.
In this part we will convert the audio indexes to video timestamps, split the video using those timestamps and combine them randomly into a new video.

First, let’s load the movie using the moviepy module:
from moviepy.video.io.VideoFileClip import VideoFileClip

video_clip = VideoFileClip(video_file_path)
Next, we’ll convert each audio frame’s start and end index to a video timestamp (MoviePy requires timestamps in seconds). We can convert sample indexes to timestamps by dividing the index by the sample rate. For example, the timestamp for the 1000th sample will be 1000 / 22050, ~0.0453.
We will then use these timestamps to cut the video and save each sub clip:
sub_clips = []
# For each frame, convert the start and end indexes of the frame
# to the location in time in the clip and subclip it
for frame_index, frame in enumerate(frames):
    start_frame, end_frame = frame

    # Convert start and end frame indexes to
    sub_clip = video_clip.subclip(start_frame / float(sr), end_frame / float(sr))

    # Save each video clip
    sub_clip.write_videofile("resources/frame{0}.mp4".format(frame_index))
    sub_clips.append(sub_clip)
Let’s take a look at some example sub clips:
The next step is to mix the sub clips that we created into a new video. We can create a new video that is longer than the original video by combining the same sub clips again and again in a random order.
We will create a new video clip that’s 5 minutes long (you can create longer clips but for this example, let’s keep it short):
# Create a sub clip from frame
def create_sub_clip(video_clip, frame, sr):
    start, stop = frame
    sub_clip = video_clip.subclip(start / float(sr), stop / float(sr))
    return sub_clip

# Save the start and end sub clips and put random clips between them
start_clip = create_sub_clip(video_clip, frames[0], sr)
end_clip = create_sub_clip(video_clip, frames[-1], sr)

max_duration = 300
video_duration = start_clip.duration + end_clip.duration

# This list will hold the sub clips for the final video
sub_clips = []

# This loop will run until our new video duration is over max duration
while True:
    # Select a random frame
    frame = random.choice(frames[1:-1])
    # Create a sub clip from the random frame
    sub_clip = create_sub_clip(video_clip, frame, sr)
    # Calculate the new video duration with this new sub clip
    video_duration += sub_clip.duration
    # If the new duration is longer than
    # the max duration, stop the loop
    if video_duration >= max_duration:
        break
    # Add the new random sub clip to our list of random sub clips
    sub_clips.append(sub_clip)

# Create a list of the random clips and the start and end clips
sub_clips = [start_clip] + sub_clips + [end_clip]

# Concatenate all sub clips into
concat_clip = concatenate_videoclips(sub_clips, method="compose")

# Output video to file
concat_clip.write_videofile("resources/got_mix.mp4")
The result will look something like:
That’s it, we now have a longer version of Sam working in the Citadel!
Source code can be found on github.
What’s next?
You’re probably wondering, what else we can do with this?
Well, I have only one thing to say about that:

10 hours of OYSTER, CLAMS and COCKLES!